This holiday season, I decided that I’m bored of forever cleaning up and making room for new apps etc – lets upgrade my laptop hard-drive I thought.
Here is what I found out.
Hard-drive choices.
Well first the obvious – what hard-drive do I need. Googling around I found out that my Acer laptop was fitted with 2.5inch SATA hard-drive. In-fact it seems all modern standard 15inch laptops seem to be fitted with this size hard-drive.
The second choice I had was between hard-drives with a spin speed of 7200rpm or 5400rpm. In the end, I chose the lower 5400rpm – battery life is important to me and the faster the hard-drive, the more milli-watts of power the drive would draw.
The third choice I had was the disk size – most of the cheaper drives are 500GB in size – that would have doubled my hard-drive. Looking through the offers on ebuyer I found a WD hard-drive rated at 1Tb – excellent!
The last choice I had was SATA-II or SATA-III. Now SATA III drives are twice as fast than SATA-II drive – so if you have a SATA-III capable laptop – then the obvious choice is SATA-III. You can fit a SATA-III hard-drive in a SATA-II capable laptop – the drive will automatically drop its speed correctly without any issues. It seems high-end (read that as expensive) laptops are SATA-III – where as budget laptops which mine is are SATA-II. In the end I chose SATA-III – thinking ahead, I could reuse the drive in a newer laptop.
If you dont know and cant google it – you need to open up your laptop (instructions below) and look at the current hard-drive. If it says “SATA 3GB/s” – that is a SATA II hard-drive. If it says “SATA 6GB/s” that is a SATA III hard-drive.
The choice was made – a bargain was found – and the drive arrived 2 days later. Great.
Tools of the trade
My laptop consists of a windows 7 – Ubuntu 12.04 dual boot. Grub 2 is used to flip between the two operating systems … not that I use windows 7 often.
Learning from previous experience, I made sure that both windows 7 was up-to-date in terms of patches, apps etc and the same for ubuntu.
I needed to second hard-drive to transfer the image – I have a 1Tb USB2 external hard-drive – so I plugged that into ubuntu, mounted the drive and cleared space to at least have enough space to fit 250GB – that was the size of my laptop hard-drive.
Next – downloaded Clonezilla. I use 32bit Clonezilla stable. I have had no end of issues with 64bit clonezilla – so even if your laptop is 64bit capable – 32bit clonezilla is the way to go. Go for the stable rated version. I chose the debian stable. Clonezilla comes as an ISO. So I used brasero (from software center) to burn the ISO image. Dont use the default “Startup disk creator” – its not clever and best avoided.
Thirdly – Windows 7 system repair disc. Now this is something you definitely should have anyway. If you dont – fireup windows 7, plug in a blank CD-R and run from the Start-Run option “recdisc”. Just hit the “Create disc” button when prompted and label your burnt CD “windows 7 boot repair”.
Forthly – use unetbootin (from the software center) and install a recent Ubuntu ISO image – e.g. 12.04.3 onto a USB stick
Backing up my hard-drive
Clonezilla makes this fairly easy – even if the text based interface is confusing at first.
Plug in your Clonezilla CD. Attach your external hard-drive. Make a folder on your external hard-drive – make this obvious in terms of its name.
Reboot – change your BIOS to boot from CD and then boot into Clonezilla.
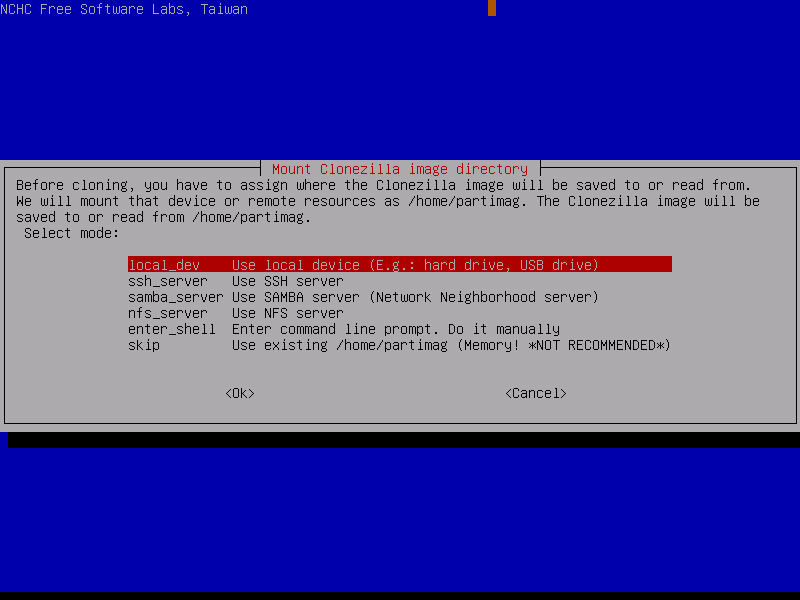
The basic premise is to accept all the defaults when prompted in Clonezilla. Screenshots are here. Use the beginners mode

After choosing “Local-dev” as “mount clonezilla image directory” – choose the external hard-drive – mine is called /dev/sdb1. /dev/sda is your internal hard-drive.
Navigate to the folder you created above on your external hard-drive (up and down arrows) and press enter to select.
Again choose all the defaults to backup onto your external drive.
Fitting the new drive
For my laptop, my hard-drive is not easily accessible. On some laptops there is a slider or small screw on the underside which – when undone – the hard-drive slides out.
For this particular laptop, flip the laptop up-side down. Remove the battery.
Look closely in the battery bay – there are usually very small screws just visible – undo all of these.
Tip 1 – use a jewellers cross-head or similar – basically something very small that fits the screw exactly.
Tip 2 – attach a bit of blue-tack to another screw driver head – dab the blue tack fitted screw driver against the undone screw to lift it free.
Now working from the back of the laptop to the front – undo every-single screw that you can see.
For my laptop the whole case then lifts off. For some laptops I’ve used in the past, they is a couple of catches you need to gently nudge inwards with a couple of flat head screw drivers.
Now I grounded myself … touch your hands against the copper pipes of your heating system to ensure there is no static electricity in your hands. You should obviously use a static wrist strap – but I dont have one…
For this laptop there was a flat ribbon cable running directly over the top of the hard-drive. This was the USB cable – so I gently pulled the black cable holder holding the cable upwards. The USB cable itself then able to be pulled without any force
Then gently push the hard-drive away from its holder. It should come away without much force.
Undo the mounting clip – two screws either side of the hard-drive and move the mounting clip to your new hard-drive.
Gently slide your new hard-drive into the holder, gently redo the USB capable into its black holder and then push the black cable holder downward to fix the USB cable in place.
Next, place the laptop cover on-top of your laptop – work from front to back. Gently push the cover in place to ensure a fit. It should never need a firm push. In my base, using a small phillips, I slightly pushed the screw driver slightly (1mm) into the headphone socket and pushed upwards. This allowed the laptop cover to snap over the headphone socket and thus there was a snug fit all around the base i.e. no gaps.
Again working from front to back replace all the screws taken out.
Fit the battery
Restoring the image
Plug in your external hard-drive, power and Boot up into clonezilla again – this time I used the “Expert Mode” together with the restore disk “select mode” option
I used the option “-k1 Create Partition table proportional” in the advanced extras screen.

Accept the warning to overwrite the new hard-drive and leave the restore to work.
Fixing Windows
Now if you are lucky, windows will boot up correctly – it will run through the consistency checker first.
If you are unlucky like me and you get the dreaded “Disk Read Error” when booting from grub this is where you use the Windows 7 boot repair disc … yes – see it is wise to create one first!!
Boot into the boot repair disk, drop to a terminal and run the commands
bootrec /fixmbr

bootrec /fixboot
Reboot – Grub will have magically disappeared and windows 7 will automatically boot.
Plug in your USB stick containing your Ubuntu ISO you installed earlier – boot to the ubuntu desktop.
Now run the boot repair process – in summary:
sudo add-apt-repository ppa:yannubuntu/boot-repair && sudo apt-get update
sudo apt-get install -y boot-repair && (boot-repair &)
That’s that – your Grub is repaired – and you can still boot between Ubuntu and Windows.
